I was hoping to make this a part of my Easy Extranet series, but it seems that Sitecore is missing a couple of small pieces that would make it possible to do this without calling in a developer. This series will show how to set up Forgot Password functionality using WFFM, EXM and an engagement plan.
Here’s the basic flow that we’re trying to create:
- User visits the password reset form, which asks for an email address.
- User enters their email address and submits the form
- The system sends a verification email to the address
- The user clicks a link in the email to verify that they own the email address
- The user is redirected to the reset password form, but now it has password and confirm password fields
- The user enters a new password and submits the form to set their password
- If the user does not complete these steps within a set time, the request expires and the process must be started from the beginning
In the Content Editor, go to /sitecore/system/Marketing Control Panel/Goals and insert a new Goal Category named Password Reset. Under that category folder, insert three goals: Password Reset Requested, Validated Email and Password Reset. Deploy these goals from the Review strip of the Ribbon.

Using a browser that supports Silverlight (booo…), open the Marketing Control Panel. Under Engagement Plans, insert a new Engagement Plan named Password Reset and open the Design interface. Insert a State and set the Name to Inactive. Click the Triggers link above the state and check the Password Reset Requested goal in the dialog.

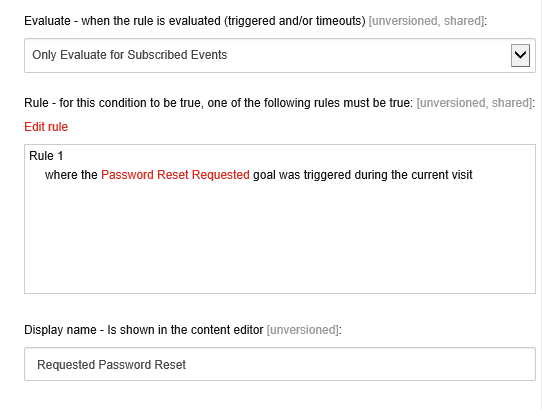
With the Inactive state selected, click the little diamond on the edge to create a connected condition. Name the condition Requested Password Reset. Double click the condition to edit its properties. In the Evaluate field, select Only Evaluate for Subscribed Events. In the Rule field select the condition where the specific goal was triggered during the current visit. Click the specific link and select the Password Reset Requested goal.
Continue adding conditions and actions to build out an engagement plan that looks like this:
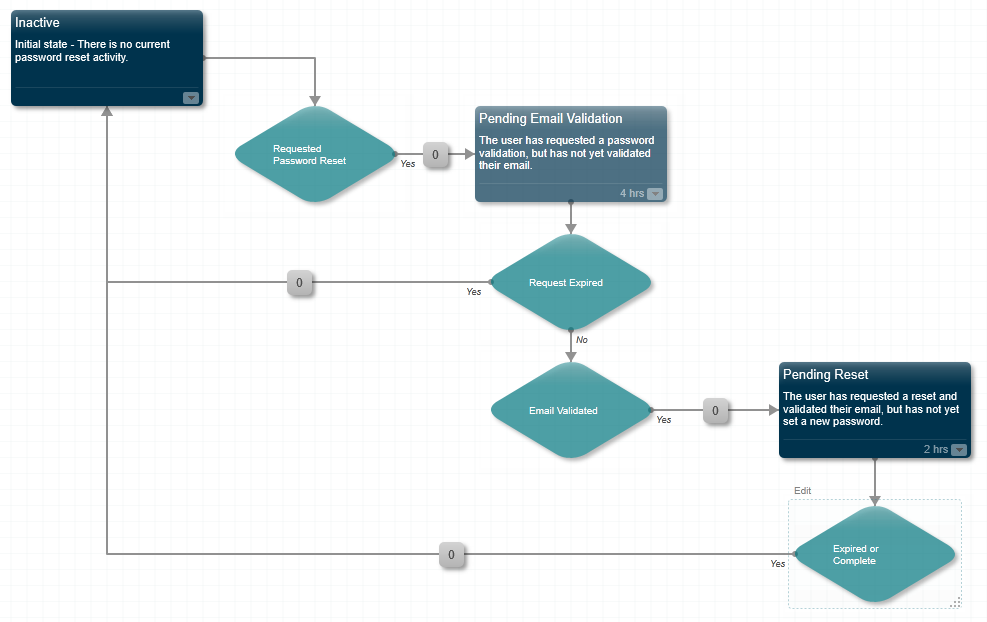
Here are the properties for each element
- State: Inactive
- Timeout: none
- Triggers: Reset Password Requested goal
- Connection: Requested Password Reset condition
- Condition: Requested Password Reset
- Evaluate: Only Evaluate for Subscribed Events
- Rule: where the Password Reset Requested goal was triggered during the current visit
- Yes Connection: Pending Email Validation state
- No Connection: none
- State: Pending Email Validation
- Timeout: 4 hours (adjust as desired)
- Triggers: Validated Email goal
- Connection: Request Expired condition
- Condition: Request Expired
- Evaluate: Always Evaluate
- Rule: where the time spent in this automation state exceeds 0 days and 240 minutes
- Yes Connection: Inactive state
- No Connection: Email Validated condition
- Condition: Email Validated
- Evaluate: Only Evaluate for Subscribed Events
- Rule: where the Validated Email goal was triggered during the current visit
- Yes Connection: Pending Reset state
- No Connection: none
- State: Pending Reset
- Timeout: 2 hours
- Triggers: Password Reset goal
- Connection: Authorization Expired condition
- Condition: Expired or Complete
- Evaluate: Always Evaluate
- Rule: where the time spent in this automation state exceeds 0 days and 120 minutes or where the Password Reset goal was triggered during the current visit
- Yes Connection: Inactive state
- No Connection: none
When you are done designing the Engagement plan, be sure to deploy it from the Review strip of the Ribbon. The Silverlight work should be done at this point, so feel free to return to your browser of choice.
The engagement plan defines most of the back-end logic for out flow. In the next post we’ll start working on the front-end.