In this post we will wrap up the Forgot Password functionality that we have been working on by adding a bit of personalization to our Forgot Password page that will show a different form if the user has successfully verified their email address.
Web Forms for Marketers has a change password save action, but it requires the user to enter their old password. That obviously won’t work for a forgot password scenario. We will need to create a custom save action to set the user’s password. Create a class with the following code:
In the Content Editor, go to /sitecore/system/Modules/Web Forms for Marketers/Settings/Actions/Save Actions and insert a Save Action item named Force Set Password. Set the Assembly and Class fields to reflect the type signature of your save action class and check the Client Action box. If you’d like, you can also select an icon for you save action.
In the Content Editor, go to /sitecore/system/Settings/Rules/Conditional Renderings/Tags/Default. In the Tags field, select Engagement Automation. This will allow us to use the condition that we created in the last post for personalization.
Return to the Forgot Password page in the Experience Editor. Select the Forgot Password form rendering and click the Personalize button in the floating toolbar.

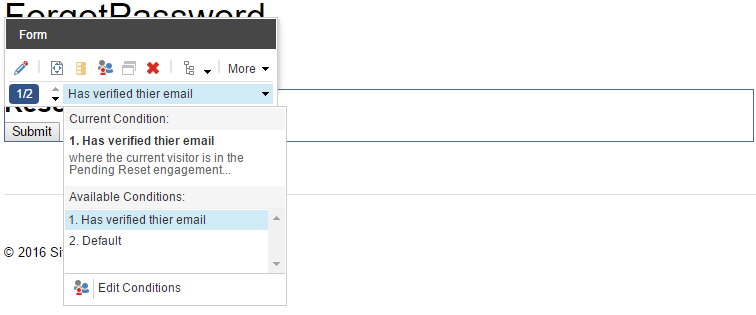
In the dialog that opens, click the New Condition button. Name the condition something like “Has verified their email” and click the Edit condition button. Select your custom condition, “where the current visitor is in the specific engagement plan state”. Click the specific link and select the Pending Reset state.
On the right side of the condition, click the ellipses on the Personalize Content field. This will open a WFFM form wizard. Select Create a blank form. Name it something like “Reset Password” and select the existing Password Reset goal. Completing the wizard will bring you back to the Personalize Component dialog.
![]()
Click OK to close the personalization dialog. Select the condition you just created and click the edit button to open the Form Designer.
Hide the form title and add a Password-confirmation filed to the form with the label Password. Select the Submit button and click the Save Actions link on the left. Add your Force Set Password save action and click OK. Edit the success message to tell the user their password has been updated. Save and close the form designer. Save your page and do an incremental site publish.
That should do it. You can now go ahead and test the full forgot password flow. Hopefully, this series has given you a feel for how some fairly complicated functionality can be implemented with just the tools provided by Sitecore a smattering of custom code.